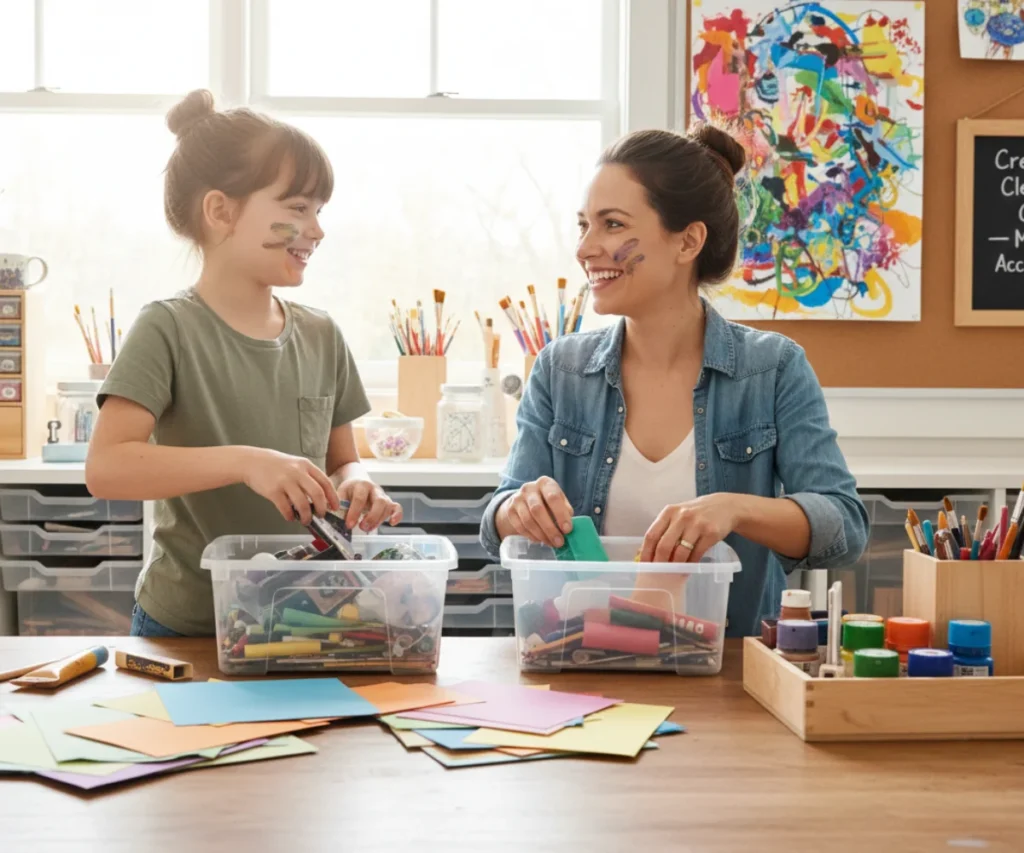
In our busy lives, finding simple, engaging activities that captivate our children and spark their creativity can feel like a quest. As parents, we often search for ways to connect, learn, and have fun together without relying on screens or elaborate setups. That’s where the magic of paper crafts comes in! They are an accessible, affordable, and incredibly rewarding way to spend quality time with your little ones, fostering their development in countless ways.
Paper crafts aren’t just about making pretty things; they’re a gateway to imagination, a workout for tiny fingers, and a fantastic opportunity for shared laughter and proud moments. Whether you have a toddler eager to tear paper or a school-aged child ready to snip and glue, these five simple paper crafts are designed to be easy, fun, and full of opportunities for personalization. Let’s dive into a world of colorful creations!
Why Paper Crafts Are Perfect for Young Children
Beyond the immediate joy they bring, paper crafts offer a wealth of developmental benefits for children. They provide a gentle, hands-on approach to learning and growth that is both effective and enjoyable for little ones.
Boosts Creativity and Imagination
With a blank sheet of paper, the possibilities are endless. Children are natural storytellers, and paper crafts provide a tangible medium for their imaginative worlds to come to life. Whether it’s turning a paper plate into a roaring lion or crafting a flower that will never wilt, these activities encourage kids to think outside the box, experiment with colors and shapes, and express their unique ideas without judgment. There’s no ‘right’ way to be creative, and that freedom is incredibly empowering for young minds.
Develops Fine Motor Skills
From holding a crayon to cutting with child-safe scissors, paper crafts are an excellent way to strengthen those small hand muscles and refine hand-eye coordination. Tearing paper, folding, gluing tiny pieces, and drawing intricate lines all contribute to developing the fine motor skills essential for tasks like writing, buttoning clothes, and self-feeding. It’s a fun workout for their hands that they won’t even realize is beneficial!
Encourages Problem-Solving
What happens if I fold it this way? How can I make this piece stick? Engaging in crafts naturally presents little challenges that children learn to navigate. They practice spatial reasoning, sequencing, and critical thinking as they figure out how different pieces fit together, how to achieve a desired shape, or what materials to use for a specific effect. These are foundational skills that will serve them well in all areas of life.
Provides Screen-Free Engagement
In an age dominated by digital devices, providing engaging, screen-free activities is more important than ever. Paper crafts offer a wonderful alternative, drawing children into a tactile, sensory experience. They learn to focus, concentrate, and find satisfaction in creating something with their own hands, reducing reliance on passive entertainment and fostering active engagement.
Fosters Family Bonding
Crafting together creates precious memories and strengthens family bonds. It’s an opportunity for parents and children to collaborate, chat, and simply enjoy each other’s company in a relaxed, creative setting. You can share stories, teach new skills, and celebrate each other’s achievements, building a sense of connection and shared joy that lasts long after the glue has dried.
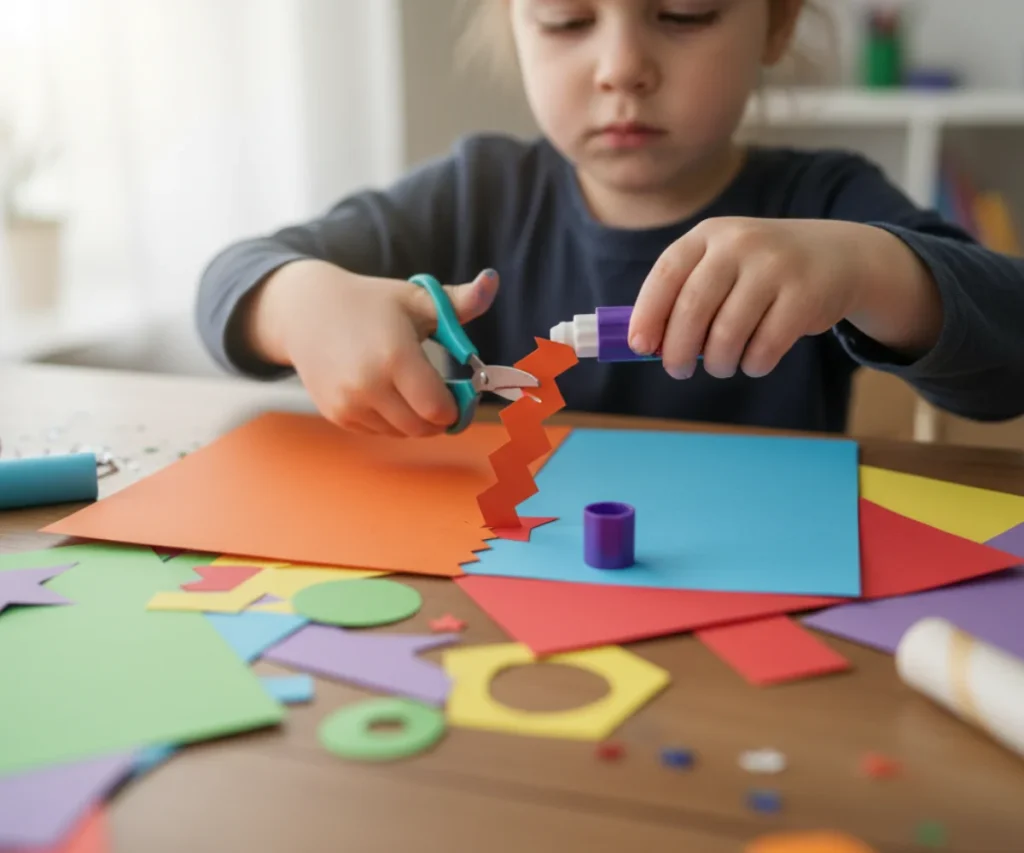
Essential Supplies for Paper Crafting Fun
One of the best things about paper crafts is how little you need to get started. Most of these items you might already have around the house. Safety first! Always supervise young children, especially when using scissors.
- Construction Paper: A rainbow of colors is always a hit.
- Safety Scissors: Child-friendly scissors are a must for little hands.
- Glue Sticks or Liquid Glue: Glue sticks are less messy, but liquid glue works well for larger areas.
- Crayons, Markers, or Colored Pencils: For decorating and adding details.
- Googly Eyes: Always a fun addition to bring characters to life.
- Recycled Materials: Old magazines, newspaper, cardboard tubes, and even paper plates can be transformed.
- Stickers and Glitter (Optional): For extra sparkle and fun!
Craft 1 Paper Plate Animals
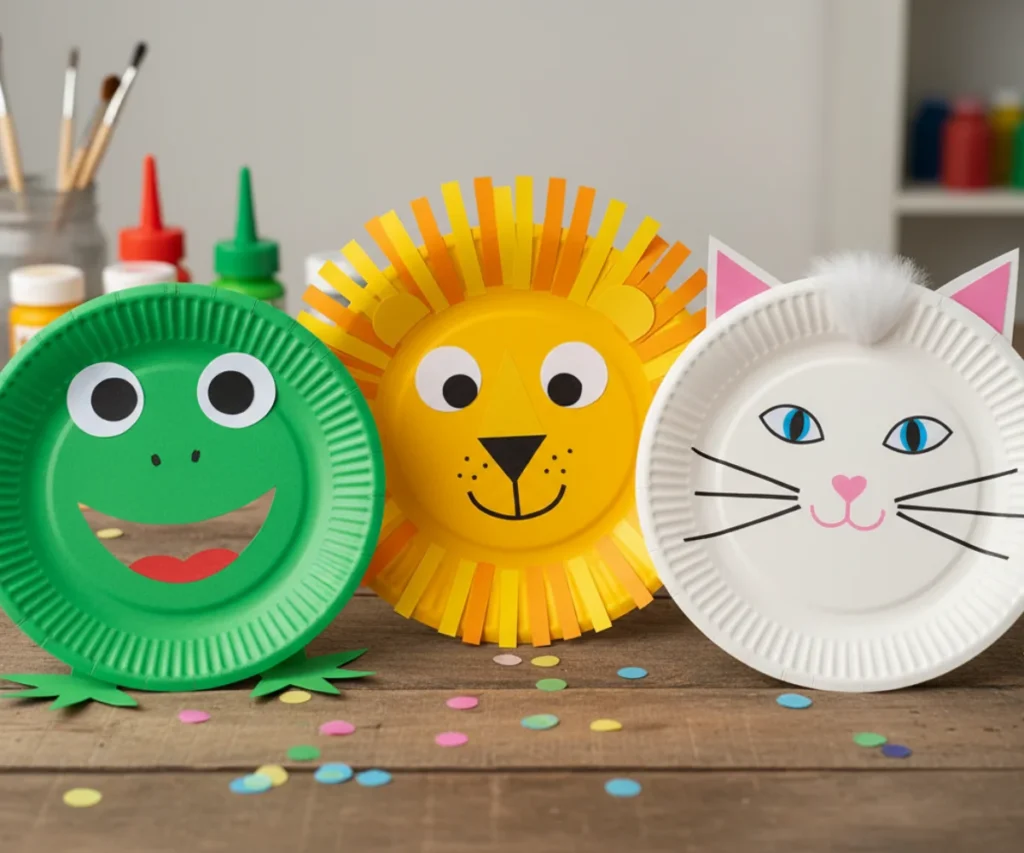
Paper plate animals are a timeless classic for a reason: they’re incredibly versatile, easy to make, and offer endless creative possibilities. From a friendly lion to a silly frog, your child can bring their favorite animals to life with just a few simple materials.
What You’ll Need
- Paper plates (the thinner ones are easier to cut)
- Construction paper in various colors
- Child-safe scissors
- Glue sticks or liquid glue
- Crayons or markers
- Googly eyes (optional, but highly recommended for personality!)
Step-by-Step Instructions
- Choose Your Animal: Let your child pick an animal they love. A lion, cat, dog, or frog are great starting points due to their simple features.
- Draw Features: On colorful construction paper, draw the animal’s features. For a lion, this might be a mane, ears, and nose. For a frog, large eyes and a smile. Help your child draw simple shapes if they need assistance.
- Cut Them Out: Guide your child in carefully cutting out the drawn features. This is excellent practice for scissor skills. You can pre-cut if your child is too young to safely use scissors.
- Decorate the Plate: Have your child color or paint the paper plate to match their chosen animal. For a lion, a yellow or orange plate; for a frog, green.
- Glue Everything On: Use glue sticks to attach the cut-out features to the decorated paper plate. Encourage your child to decide where the eyes, ears, and nose should go.
- Add Googly Eyes: If using, glue on googly eyes for an instant boost of character and charm.
- Finishing Touches: Use markers or crayons to add extra details like whiskers, spots, or a smiling mouth.
Parenting Tip
Embrace imperfection! The beauty of paper plate animals lies in their child-like charm. Don’t worry if the eyes aren’t perfectly symmetrical or the mane is a bit lopsided. Focus on the joy your child experiences in creating something and the fine motor skills they are developing. Praise their effort and imagination, not just the final product.
Craft 2 Paper Chain Rainbows
Paper chains are a classic craft that never goes out of style. They’re simple, repetitive (which can be soothing for some kids!), and the result is a vibrant decoration that brings cheer to any room. Creating a rainbow paper chain is a wonderful way to teach colors and create something beautiful together.
What You’ll Need
- Construction paper in rainbow colors (red, orange, yellow, green, blue, purple)
- Child-safe scissors
- Glue sticks or tape
Step-by-Step Instructions
- Cut Paper Strips: Cut each sheet of construction paper into strips. Aim for strips about 1 inch wide and 8-10 inches long. You’ll need several strips of each color. Younger children can practice tearing paper strips, which is also great for fine motor skills.
- Form the First Loop: Take a red strip. Bring the two ends together to form a loop and secure them with a glue stick or a piece of tape.
- Add the Next Color: Take an orange strip. Thread it through the red loop, then bring its ends together to form a loop, securing them. This creates the first link in your chain.
- Continue the Pattern: Keep adding colors in rainbow order (red, orange, yellow, green, blue, purple), linking each new strip through the previous one.
- Create Rainbow Arcs: Once you have a long chain, gently curve it into a rainbow shape. You can make smaller, multiple rainbows or one big one.
- Display Your Rainbow: Hang your colorful paper chain rainbow in a window, across a doorway, or on a wall to brighten your home.
Parenting Tip
This craft is fantastic for practicing color recognition and sequencing. As you go, talk about the colors of the rainbow and what other objects are those colors. For older kids, you can introduce counting how many loops they’ve made of each color, adding a subtle math lesson to the fun.
Craft 3 Accordion Fold Animals or Fans
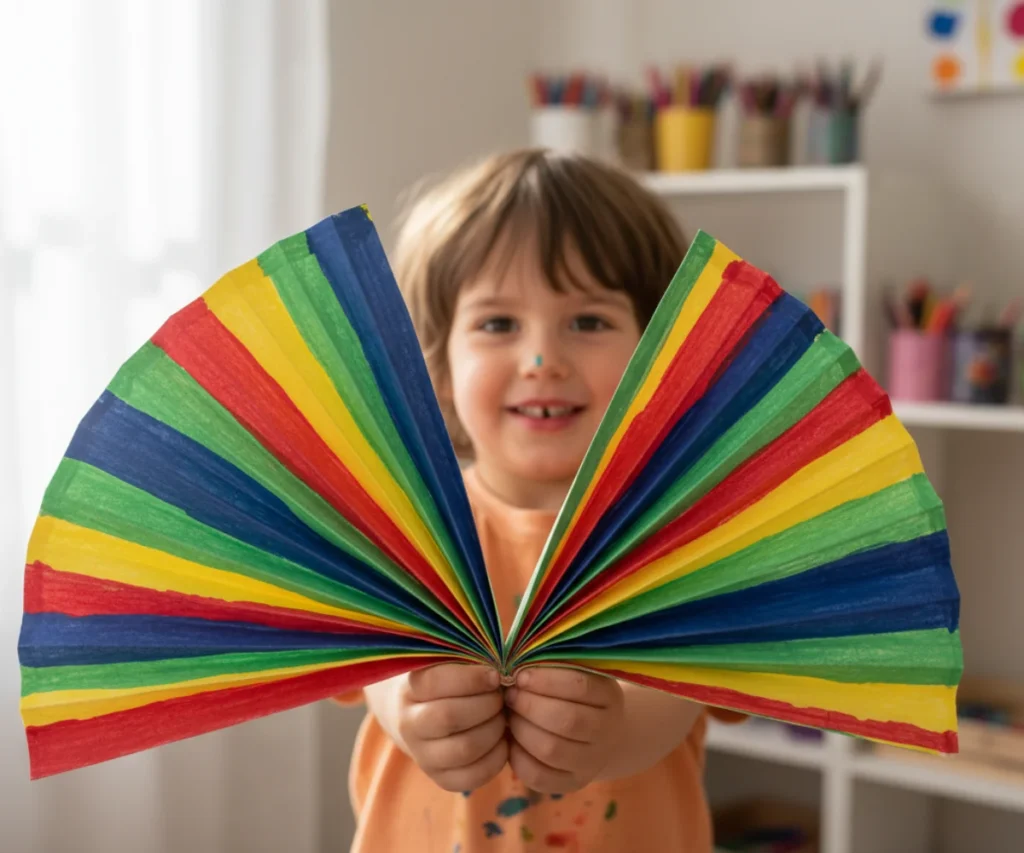
Accordion folding is a super simple technique that adds a fun, textured dimension to paper crafts. It’s excellent for developing hand dexterity and understanding how flat paper can be transformed into a 3D object. You can use it to make playful animals with springy bodies or practical, colorful fans for a warm day.
What You’ll Need
- Construction paper in various colors
- Child-safe scissors
- Glue sticks or liquid glue
- Markers or crayons
- Googly eyes (optional)
Step-by-Step Instructions (Accordion Animals)
- Choose a Body Color: Pick a piece of construction paper for the animal’s body.
- Accordion Fold: Start at one end of the paper and fold a small section (about 1 inch) over. Flip the paper over and fold the same size section back. Continue folding back and forth like an accordion until you reach the end of the paper. This creates a springy, wavy strip.
- Shape the Body: Gently pinch the folded paper in the middle to create the animal’s body. If it’s a caterpillar, you might leave it as is. For other animals, you might glue it slightly open to form a circular body.
- Add Head and Features: On another piece of paper, draw and cut out a head, ears, legs, and a tail for your chosen animal.
- Assemble Your Animal: Glue the head and other features onto the accordion-folded body. Add googly eyes and draw on a face with markers.
Step-by-Step Instructions (Accordion Fans)
- Pick Paper: Choose a sheet of construction paper, preferably a slightly thicker one.
- Accordion Fold: Follow step 2 from the animal instructions to accordion-fold the entire sheet of paper.
- Secure One End: Gather one end of the folded paper tightly and secure it with a dab of glue or a piece of tape.
- Open and Fan: Gently spread open the other end of the folded paper to create a beautiful fan. You can decorate it with patterns before folding for an extra touch!
Parenting Tip
Accordion folding can be tricky for very young children. Guide their hands and show them the back-and-forth motion. Emphasize that it’s okay if the folds aren’t perfectly even. The goal is the process and the development of fine motor control, not a flawless fold. For fans, decorating the paper *before* folding can add another layer of fun and creativity.
Craft 4 DIY Paper Flowers
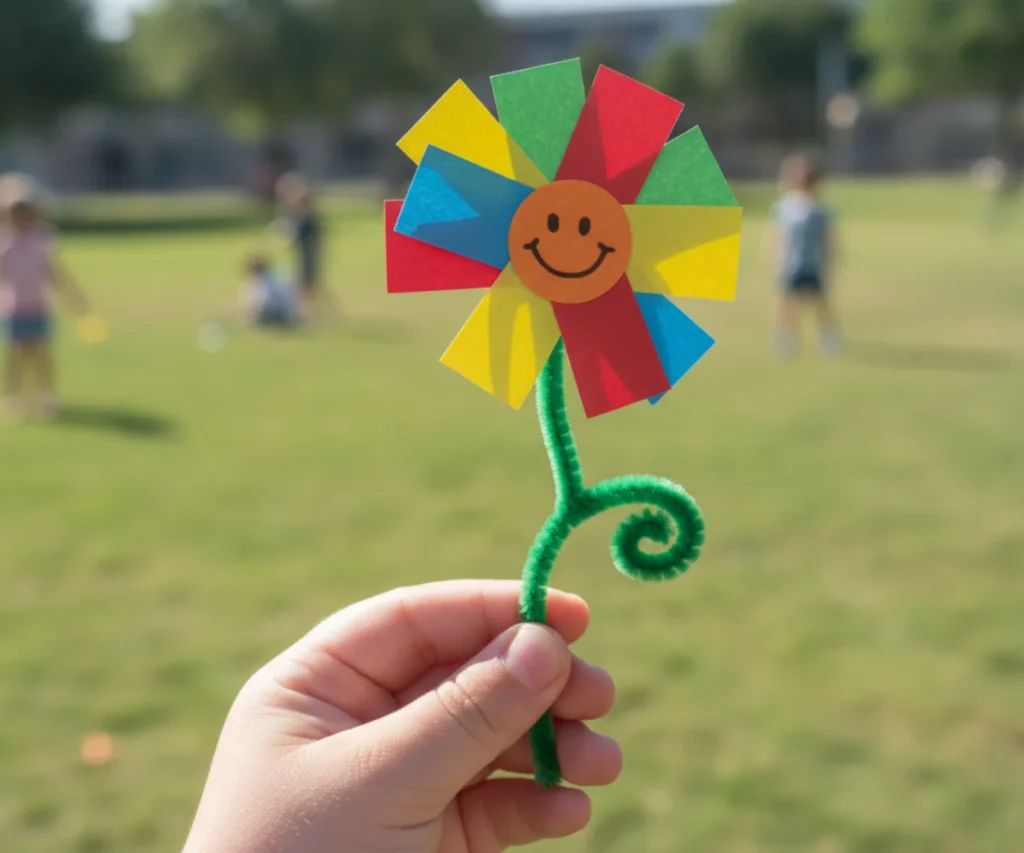
Bringing a touch of nature indoors with handmade paper flowers is a lovely activity. These flowers are simple to make, never wilt, and are perfect for decorating a child’s room or giving as a thoughtful gift. They also offer a fantastic opportunity to practice cutting and gluing in different ways.
What You’ll Need
- Construction paper in various bright colors (for petals and leaves)
- Green construction paper or pipe cleaners (for stems)
- Child-safe scissors
- Glue sticks or liquid glue
- Crayons or markers (for details)
Step-by-Step Instructions
- Cut Petal Shapes: On various colored papers, draw and cut out multiple simple petal shapes. These can be teardrop shapes, rounded ovals, or even just circles that will be slightly overlapped. You’ll need about 5-8 petals per flower.
- Cut Flower Center: Cut a small circle from yellow or contrasting paper for the center of your flower.
- Assemble Petals: Apply a small amount of glue to the bottom of each petal and arrange them in a circle on a flat surface or directly onto a green stem base (if using a pre-cut paper circle as a base). Overlap them slightly to create a full bloom effect.
- Add the Center: Once the petals are arranged, glue the small yellow circle in the middle to form the flower’s center.
- Create a Stem: You have a couple of options for the stem:
- Paper Stem: Cut a long, thin strip of green construction paper and glue it to the back of the flower. You can also cut out leaf shapes and glue them onto the stem.
- Pipe Cleaner Stem: Twist a green pipe cleaner around the base of the flower from the back. This makes the flower posable!
- Decorate: Use markers or crayons to add details like veins on the petals or texture in the center.
Parenting Tip
This craft allows for lots of creative choice. Let your child experiment with different petal shapes and sizes. They might want a giant sunflower or a tiny daisy! Discuss the colors of real flowers and encourage them to choose colors that make their flower unique. You can also talk about symmetry as they arrange petals, or simply let them place them freely.
Craft 5 Torn Paper Collages
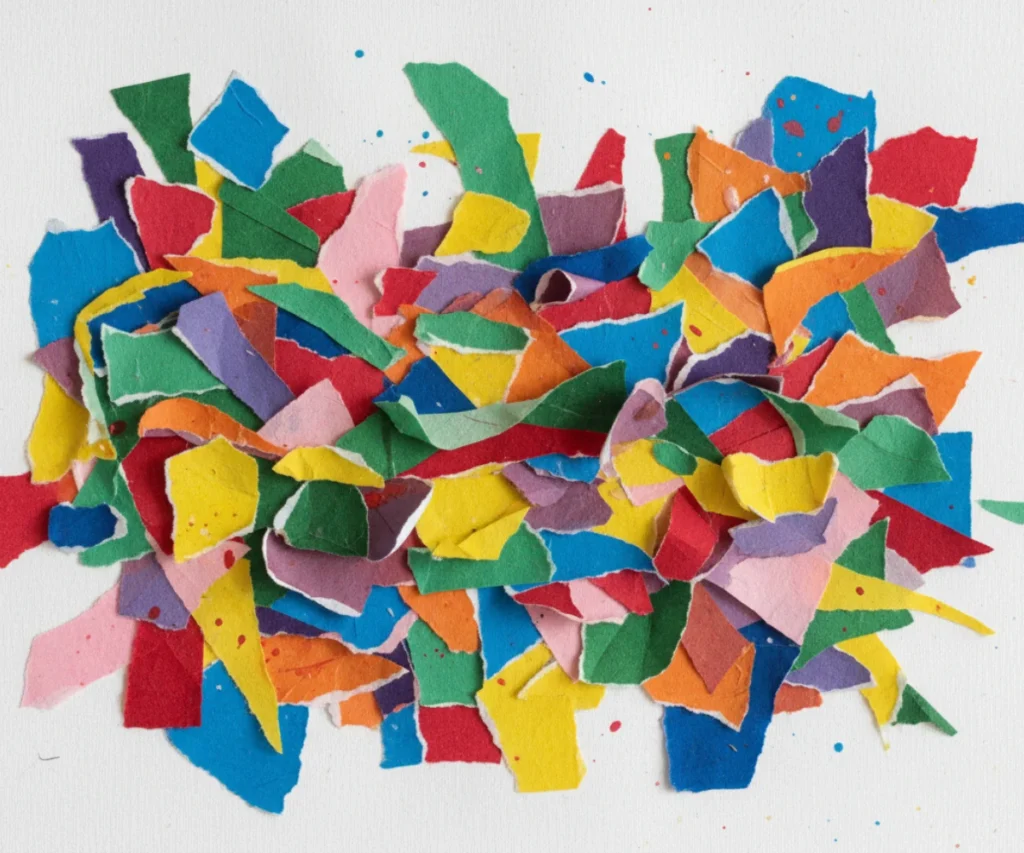
Torn paper collages are perfect for even the youngest crafters, as they don’t require scissors and are a fantastic sensory experience. The act of tearing paper helps develop hand strength and coordination, and arranging the pieces encourages creativity and spatial awareness. The result is always a unique and textural piece of art!
What You’ll Need
- Various colored construction paper, old magazines, or newspaper
- A larger sheet of paper or cardboard as a base
- Glue sticks or liquid glue
Step-by-Step Instructions
- Gather Tearing Material: Collect a variety of papers. Construction paper works well for solid colors, but old magazines with interesting pictures or newspaper for different textures can add depth.
- Start Tearing: Show your child how to tear the paper into smaller pieces. There’s no right or wrong way – encourage them to make big tears, small tears, jagged tears, and smooth tears. This is a wonderful sensory activity and excellent for building hand strength.
- Plan Your Design (or Not!): Before gluing, encourage your child to arrange the torn pieces on their base paper. They might want to create a picture (a tree, a house, an abstract design) or simply fill the page with colors. For younger kids, free-form tearing and gluing is perfectly fine.
- Glue the Pieces Down: Apply glue to the back of each torn piece and press it onto the base paper. You can layer pieces, overlap them, or leave gaps – whatever your child prefers.
- Fill the Space: Continue tearing and gluing until your child is satisfied with their collage.
- Display Your Masterpiece: Once the glue is dry, proudly display your child’s unique torn paper collage.
Parenting Tip
This craft is all about the process and the sensory experience. For toddlers, focus on the joy of tearing and sticking. For preschoolers, you can introduce concepts like colors, shapes (even if torn), and layering. Let them lead the design. If they just want to make a big pile of torn paper and glue it down, that’s perfectly okay! It’s their exploration.
Tips for a Smooth Crafting Session
Crafting with kids is a wonderful experience, but a little preparation and a relaxed mindset can make it even better. Here are some tips to ensure your crafting time is enjoyable for everyone.
Set Up for Success
Before you even bring out the supplies, take a moment to prepare your space. Lay down newspaper or a washable tablecloth to protect your table. Have all your chosen materials within easy reach. Small bowls for paper scraps or glue sticks can help keep things organized. A little pre-planning goes a long way in preventing frustration for both you and your child.
Embrace the Mess
Crafting with kids inevitably involves a bit of mess – glue on fingers, paper scraps everywhere, maybe a rogue crayon mark. Try to let go of the need for perfection and embrace the creative chaos. Remind yourself that a messy craft table is often a sign of a happy, engaged child. Have wipes or a damp cloth ready for quick clean-ups, and focus on the fun rather than the tidiness.
Focus on the Process, Not Perfection
It’s easy to want your child’s craft to look a certain way, but the true value lies in the experience. Encourage their efforts and creativity, even if the end result isn’t exactly what you envisioned or what an example might look like. The goal is for them to explore, experiment, and develop skills, not to create a museum-worthy piece. Their unique creation is perfect because they made it.
Let Them Lead
Once you’ve introduced the craft, step back a bit and let your child take the reins. Offer guidance and assistance when needed, but allow them the freedom to make choices, problem-solve, and express themselves. This fosters independence and boosts their confidence. If they want to put the lion’s ears on its chin, go for it! It’s their art.
Celebrate Their Creations
When the craft is finished, make sure to celebrate their accomplishment! Display their artwork proudly – on the fridge, a bulletin board, or even framed in their room. Acknowledge their hard work, creativity, and the joy they found in the process. This positive reinforcement encourages them to continue exploring their artistic side and cherishing the memories of your crafting time together.
Conclusion
Paper crafts are more than just simple activities; they’re opportunities for connection, learning, and imaginative play. They provide a wonderful break from screens, offering tangible ways for children to express themselves and develop crucial skills. So, gather your paper, glue, and scissors, and get ready to embark on a colorful adventure with your little ones. Remember, it’s not about making a perfect masterpiece, but about cherishing the moments, celebrating their efforts, and watching their creativity blossom. Happy crafting, parents!