
Welcoming a new baby into the world is a joyous occasion, often celebrated with baby showers filled with love, laughter, and thoughtful gifts. While store-bought presents are always appreciated, there’s something truly special about a handmade gift that shows you’ve poured your heart into it. Enter the diaper cake-a charming, practical, and surprisingly simple DIY project that makes a fantastic centerpiece and a much-needed supply for new parents.
You might look at those intricate diaper cakes online and think, “That’s beyond me!” But I promise you, making a beautiful diaper cake at home doesn’t have to be stressful. With a little guidance and a few simple steps, you’ll be crafting a memorable and useful gift that will surely impress. Let’s dive in and create something wonderful together.
Why Make a Diaper Cake

Beyond being adorable, a homemade diaper cake is a gift that truly keeps on giving. Here’s why they’re such a fantastic choice for baby showers, gender reveals, or even as a welcome-home gift for new parents:
- Practicality New parents can never have enough diapers! A diaper cake provides a generous supply of an essential item, often in various sizes, which is incredibly helpful.
- Personalization Unlike a standard gift, a diaper cake offers endless opportunities for customization. You can match it to the nursery theme, the baby’s gender, or the parents’ personal style.
- Thoughtfulness The effort you put into creating something by hand speaks volumes. It shows you care enough to dedicate your time and creativity, making the gift feel extra special.
- Budget-Friendly While you’re buying diapers anyway, adding a few inexpensive ribbons and baby items allows you to create a show-stopping gift that looks far more expensive than it is.
- Centerpiece Potential A well-made diaper cake isn’t just a gift; it’s often a beautiful focal point for any baby celebration.
Gathering Your Supplies
Before you begin your crafting adventure, gather all your materials. Having everything at hand will make the process smooth and stress-free. Think of it like baking-you wouldn’t start without all your ingredients ready!
Essential Diaper Cake Materials
- Diapers You’ll need a good quantity, typically 60-80 for a three-tier cake. Newborn or size 1 diapers are common, but including a mix of sizes (e.g., size 1 and size 2) can be even more practical for parents.
- Small Rubber Bands or Clear Hair Ties These are crucial for holding individual diapers rolled up.
- Large Rubber Bands You’ll need a few of these to secure each tier of diapers together.
- Paper Towel Roll or Cardboard Tube This will serve as the central support for your cake.
- Sturdy Cardboard Base A round cake board (available at craft stores or baking supply stores) or a piece of cut cardboard, about 12-14 inches in diameter, will provide stability.
- Strong Ribbon or Twine For securing the tiers more permanently and for decoration.
- Hot Glue Gun and Glue Sticks For attaching decorations securely.
Fun Decorations to Personalize
- Decorative Ribbons Wide, colorful ribbons to wrap around each tier.
- Small Baby Items Think rattles, pacifiers, baby socks, washcloths, small bottles, baby spoons, or teething toys.
- Plush Toys A small stuffed animal often sits atop the cake or nestles between tiers.
- Artificial Flowers or Greenery For an elegant touch.
- Personalized Tags or Embellishments To add the baby’s name or a sweet message.
- Cello Wrap or Tulle To wrap the finished cake for presentation.
Step-by-Step Guide to Building Your Diaper Cake
Now for the fun part! Follow these steps, and you’ll have a beautiful diaper cake in no time.
Step 1 – Preparing the Diapers
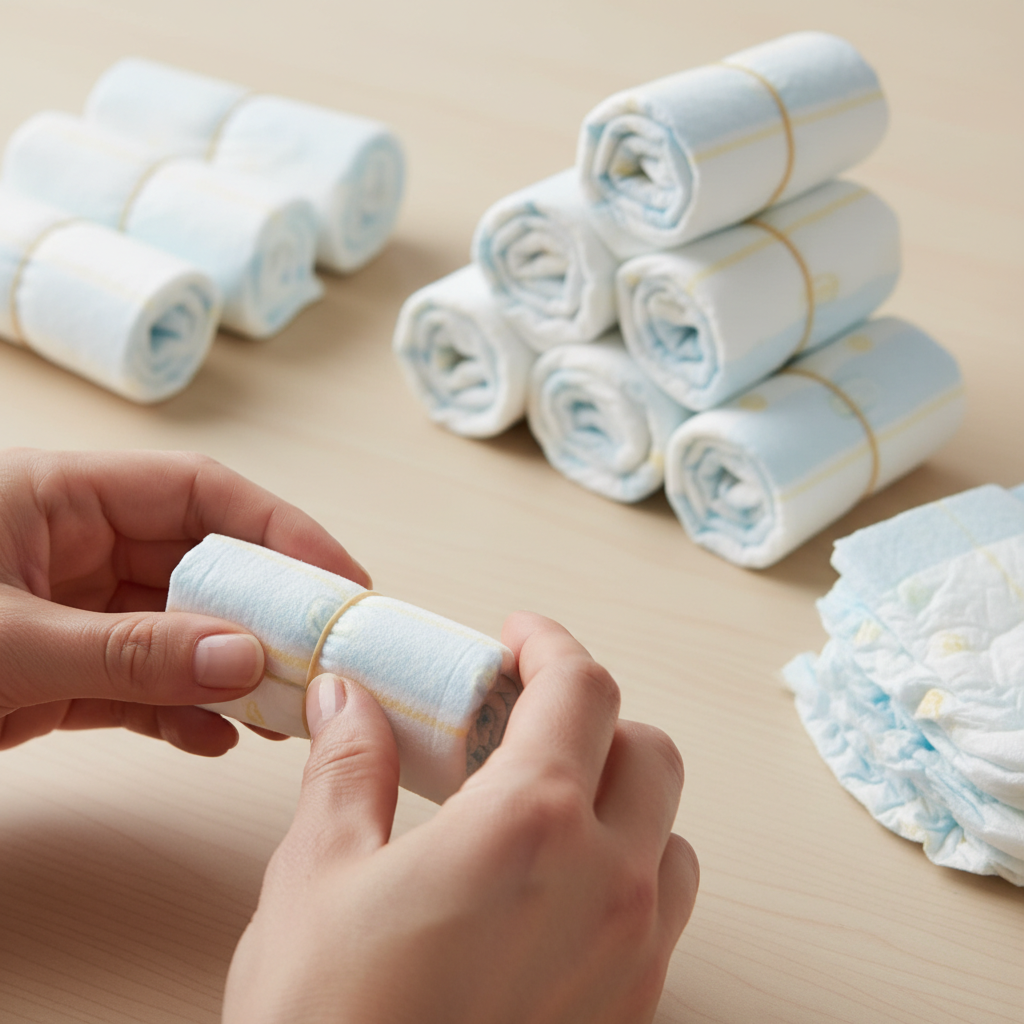
This is the most time-consuming but essential step. Take each diaper, lay it flat, and starting from the open end, roll it tightly towards the folded waistline. Once rolled, secure it with a small rubber band or clear hair tie. Repeat this for all your diapers. Consistency in rolling will make your cake look neater.
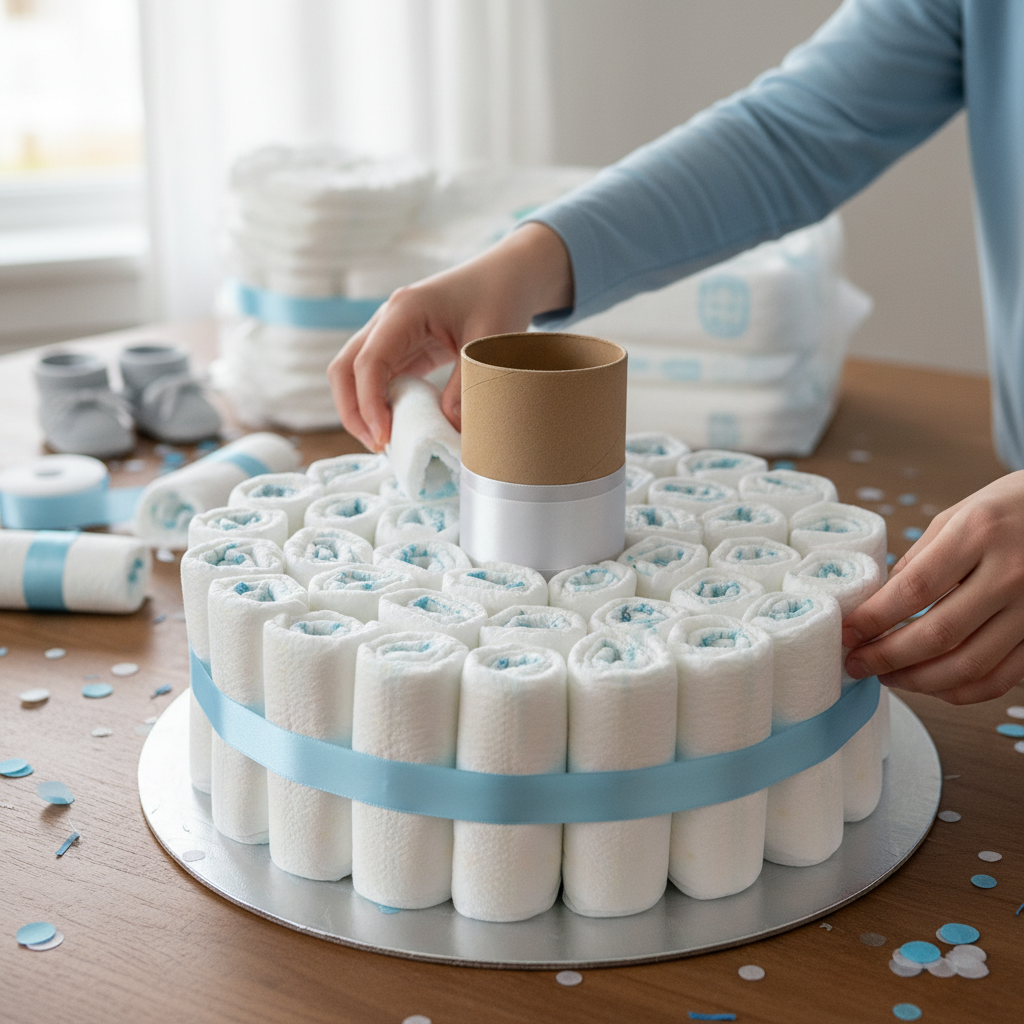
Step 2 – Building the Base Tier
Place your cardboard tube (paper towel roll) upright in the center of your cardboard base. Begin arranging your rolled diapers around the tube. The first layer should be snug against the tube. Once you have a ring of diapers, place another ring around the first, and continue until your base tier is the desired size (this will be your largest tier). Once satisfied, carefully wrap a large rubber band around the entire tier to hold all the diapers in place. You can also use a long piece of strong ribbon, tying it tightly.
Step 3 – Creating the Second Tier
For the second tier, you’ll repeat the process, but this tier will be slightly smaller than the base. You can either build it directly on top of the base tier (around the same central tube) or build it separately and then stack it. Again, secure the tier with a large rubber band or ribbon once complete.
Step 4 – Adding the Top Tier
The top tier will be the smallest. Depending on your design, you might only need a few diapers for this. Build it around the central tube, secure it, and place it on top of your second tier.
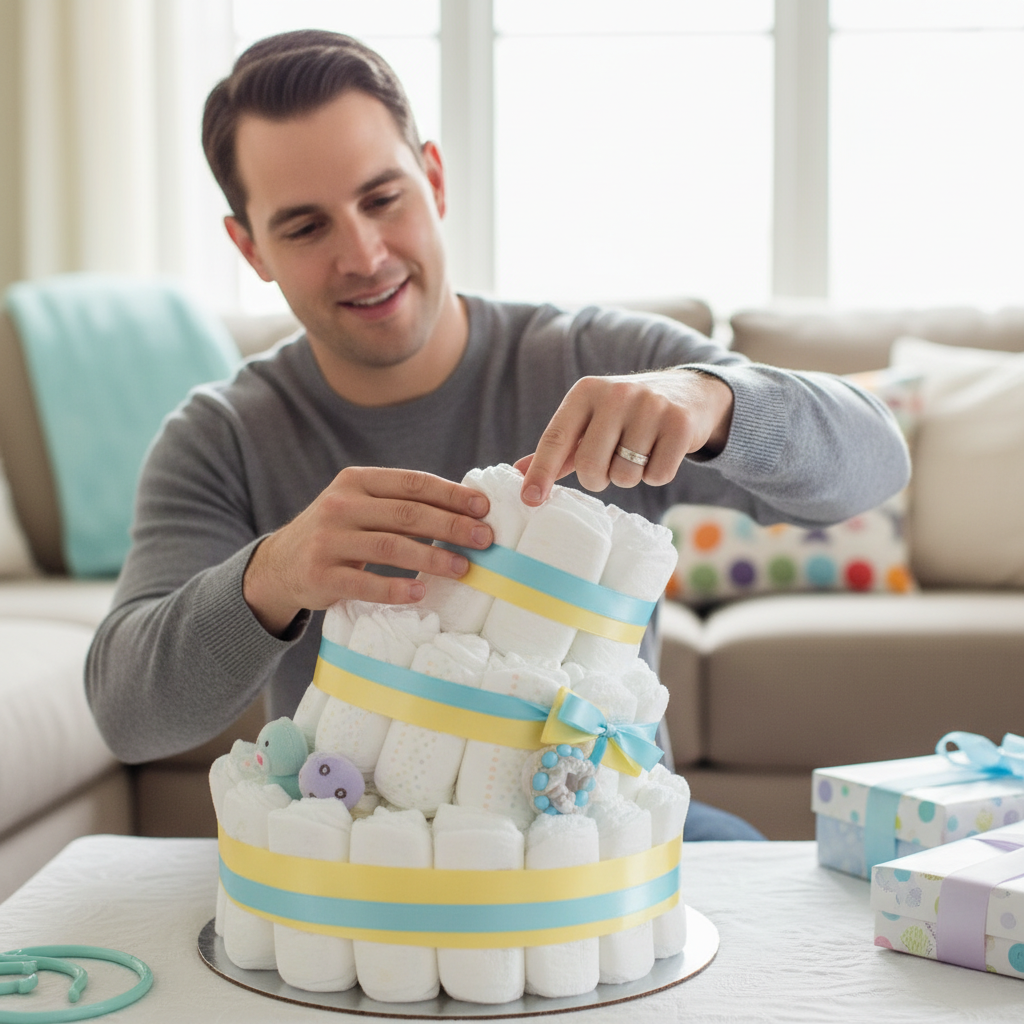
Step 5 – Securing the Cake Structure
Once all your tiers are stacked, you might want to reinforce the structure. You can use a longer, decorative ribbon to wrap around all three tiers, securing them tightly. If your central tube feels wobbly, you can use a bit of hot glue to secure it to the cardboard base, but be gentle so as not to damage the diapers.
Step 6 – Decorating Your Masterpiece
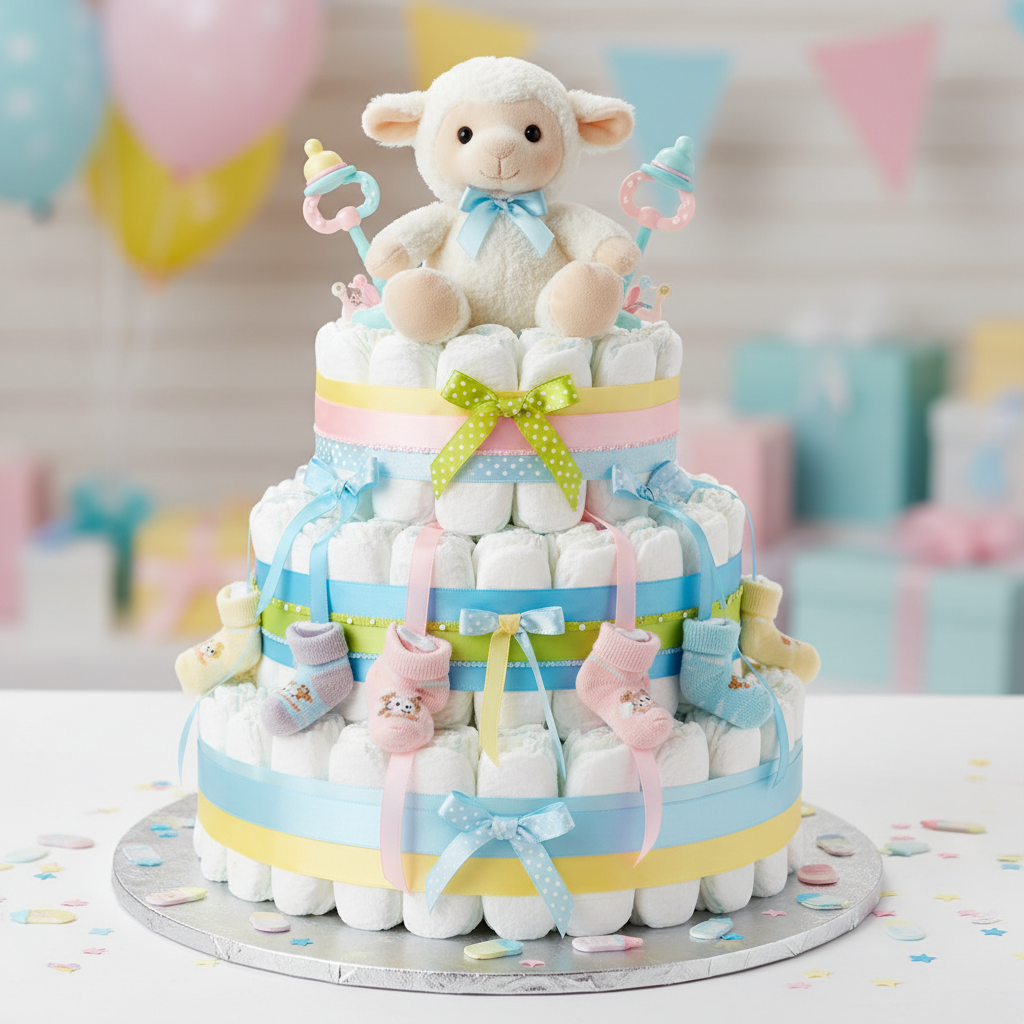
This is where your creativity shines! Unwrap your decorative ribbons and carefully wrap them around each tier, covering the large rubber bands. Use a hot glue gun to secure the ribbon ends. Now, tuck your small baby items, plush toys, and artificial flowers into the gaps between the diapers or attach them to the ribbons. A popular choice is to place a cute plush toy on top of the cake, acting as the “cherry on top.” Remember to distribute your decorations evenly for a balanced look.
Creative Ideas for Your Diaper Cake
Don’t be afraid to think outside the box! Here are some themes to inspire your unique creation:
| Theme | Decoration Ideas |
|---|---|
| Woodland Adventure | Plush fox, owl, or bear; pinecones; green, brown, and ivory ribbons; small faux leaves. |
| Little Star | Star-shaped rattles; silver and gold ribbons; small LED fairy lights (battery operated); moon or star-themed baby items. |
| Ocean Wonders | Small octopus or fish toys; blue and green ribbons; seashells (clean and safe); a little boat toy. |
| Royal Princess/Prince | Mini tiara or crown; pink/blue and gold/silver ribbons; faux pearls; elegant baby booties. |
| Sports Fanatic | Miniature football, basketball, or baseball; team-colored ribbons; baby sports jersey. |
Consider the parents’ hobbies or passions for an extra personal touch!
Troubleshooting Common Diaper Cake Challenges
Even seasoned crafters encounter a hiccup or two. Don’t stress if things don’t go perfectly the first time:
- Wobbly Cake If your cake feels unstable, ensure your central tube is firmly attached to the base. You might need to use more diapers in the base tier or tighten the large rubber bands/ribbons. A stronger cardboard base also helps.
- Diapers Unrolling Make sure each diaper is rolled very tightly and secured with a small rubber band. If they’re slipping, use tighter bands or double them up.
- Running Out of Diapers If you find yourself short, don’t panic! You can either make your tiers slightly smaller or make a quick trip for another small pack. Remember, it’s about the gesture, not the exact diaper count.
- Decorations Falling Off Use a hot glue gun for a strong hold on ribbons and heavier items. For lighter items, simply tucking them securely between diapers often works.
Gifting Your Homemade Diaper Cake
Once your masterpiece is complete, it’s time to prepare it for gifting. For transportation, wrapping the entire cake in clear cello wrap or tulle will protect it and keep all the decorations in place. Tie the top with a large bow. Don’t forget to include a thoughtful card expressing your well wishes for the new parents and baby.
Presenting a homemade diaper cake is more than just giving a gift; it’s sharing a piece of your heart and creativity. The parents will appreciate the practicality of the diapers and be touched by the personal effort you put into making something so special just for them.
Conclusion
Creating a diaper cake at home without stress is absolutely achievable! It’s a wonderful way to offer a practical, beautiful, and heartfelt gift that stands out from the crowd. By following these simple steps, gathering your supplies, and adding your unique personal touches, you’ll create a memorable present that celebrates the arrival of a new little one. So, take a deep breath, gather your materials, and enjoy the process. The joy you bring to new parents with your thoughtful creation will be well worth it!