As new parents, every little detail about your baby’s health and hygiene can feel like a monumental task, and earwax is no exception. Seeing earwax in your baby’s delicate ears might instinctively make you want to grab a cotton swab, but when it comes to those tiny ears, less is often more – and safety is paramount. Rest assured, earwax is a natural and healthy part of your baby’s ear protection system. Most of the time, it doesn’t need any intervention from you. However, there are times when a little gentle care might be necessary. This guide will walk you through safe, effective, and pediatrician-approved methods for managing your baby’s earwax, along with crucial advice on what to absolutely avoid.
Understanding Baby Earwax: Nature’s Protector

Earwax, or cerumen, might look a bit messy, but it plays a vital role in keeping your baby’s ears healthy. It’s a natural, protective substance produced by glands in the outer part of the ear canal. Think of it as a tiny, built-in cleaning and defense system. Here’s what it does:
- Protects: It forms a protective barrier against dust, dirt, tiny insects, and other foreign particles from reaching deeper into the ear canal and potentially damaging the eardrum.
- Lubricates: It keeps the skin in the ear canal moist, preventing dryness, itching, and irritation.
- Fights Germs: Earwax contains antibacterial and antifungal properties that help prevent infections.
For most babies, earwax naturally moves out of the ear canal on its own through jaw movements (like crying, yawning, or feeding). It then dries up and flakes away, often unnoticed. This self-cleaning mechanism is incredibly efficient.
Why Some Babies Have More Earwax

While earwax production is normal, some babies naturally produce more than others. Several factors can influence the amount and consistency of your baby’s earwax:
- Genetics: Just like hair color or eye color, earwax production can be hereditary.
- Narrower Ear Canals: Babies naturally have smaller, more delicate ear canals. For some, these canals might be narrower, making it appear that there’s more wax buildup or making it harder for the wax to exit naturally.
- Increased Production: Sometimes, the body simply produces more earwax than usual. This isn’t necessarily a problem unless it leads to symptoms.
- External Factors: Using cotton swabs or other objects can actually push earwax deeper into the canal, compacting it and making it harder for the ear to clean itself. This is why intervention often backfires.
When to Consider Cleaning Baby Earwax

In most cases, you don’t need to do anything about your baby’s earwax. However, there are a few situations where a gentle, external cleaning might be beneficial, or when you should consult a pediatrician:
Signs That Might Indicate a Need for Attention:
- Visible Buildup on the Outer Ear: If you notice visible earwax accumulating around the opening of the ear, on the outer ear, or behind the earlobe.
- Mild Discomfort: If your baby is gently tugging at their ear, though this is often a sign of teething or an ear infection, not necessarily earwax.
- Concerns from a Pediatrician: During a routine check-up, your pediatrician might notice significant buildup.
Signs That Warrant a Pediatrician Visit IMMEDIATELY:
- Excessive Tugging or Rubbing: More aggressive or frequent tugging, especially with fussiness or crying.
- Foul Odor or Discharge: Any liquid, pus, or unpleasant smell coming from the ear. This could indicate an infection.
- Redness or Swelling: Around the ear or inside the ear canal.
- Fever: Especially if accompanied by ear symptoms.
- Changes in Hearing: If your baby seems less responsive to sounds, isn’t startled by loud noises, or has difficulty hearing.
- Balance Issues: If your baby seems unusually clumsy or unbalanced.
- Pain: Crying inconsolably or expressing pain when the ear is touched.
These symptoms are more likely indicators of an ear infection or significant impaction, which requires professional medical attention, not at-home cleaning.
The Golden Rule: What NOT to Do When Cleaning Baby Earwax

This is perhaps the most crucial section of this guide. Many common practices for ear cleaning are incredibly dangerous for babies and should be avoided at all costs. Their ear canals are tiny, delicate, and easily damaged.
Absolutely AVOID These Methods:
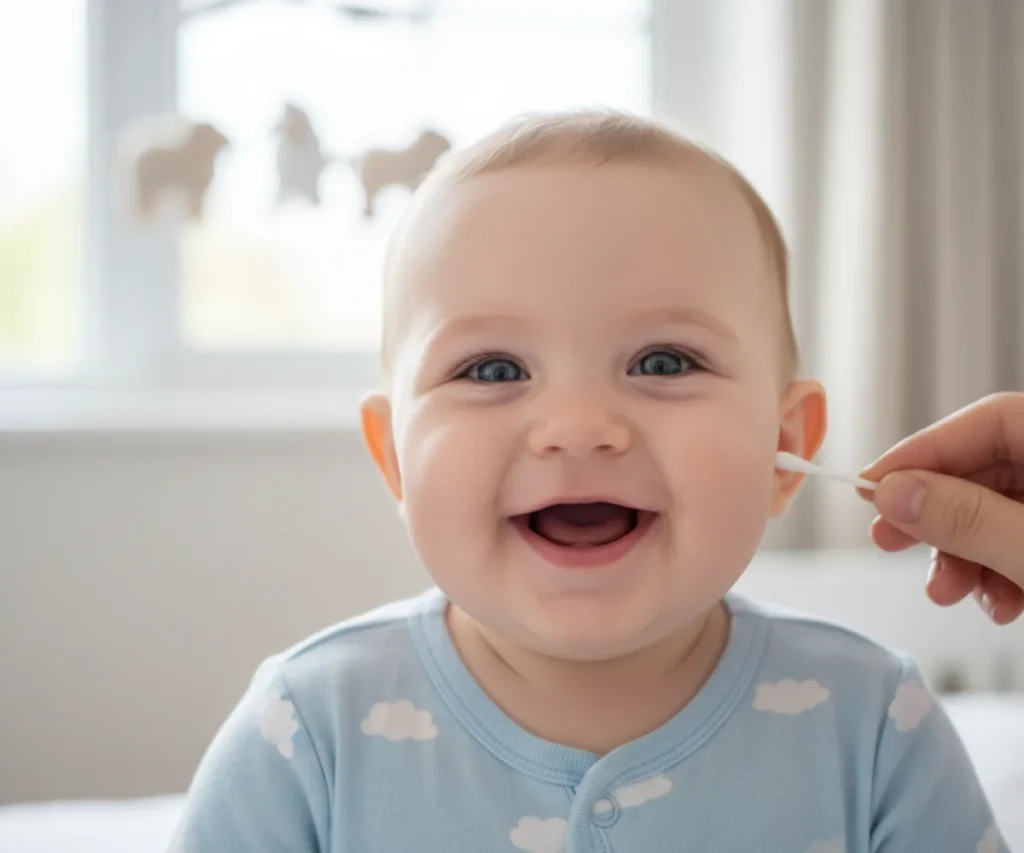
- Cotton Swabs (Q-tips) or Cotton Buds: This is the biggest offender. While they seem designed for ears, cotton swabs are too large for a baby’s ear canal and can:
- Push Wax Deeper: Instead of removing wax, they often compact it against the eardrum, making buildup worse and potentially leading to impaction.
- Damage the Eardrum: A sudden movement from your baby (or you) could cause the swab to pierce the eardrum, leading to severe pain, hearing loss, and infection.
- Scratch the Ear Canal: Even gentle use can scratch the delicate skin, creating openings for infection.
- Ear Candling: This involves inserting a hollow candle into the ear and lighting it. It’s a dangerous practice that can cause burns, perforated eardrums, and doesn’t actually remove earwax effectively. It is completely ineffective and harmful.
- Fingers or Sharp Objects: Never insert your fingers, fingernails, hairpins, keys, or any other sharp object into your baby’s ear. The risk of injury is extremely high.
- Irrigation/Syringing at Home (without professional guidance): While a doctor might use irrigation for severe impaction, attempting this at home without proper tools, technique, and medical advice can introduce water into the middle ear or damage the eardrum.
- Over-the-Counter Ear Drops Not Formulated for Babies: Adult ear drops can be too harsh or contain ingredients unsuitable for a baby’s sensitive ears. Always consult your pediatrician before using any ear drops.
Safe and Gentle Home Cleaning Methods

For most babies, no internal ear cleaning is needed. The focus should always be on the *outer* ear. If you notice a small amount of wax at the entrance of the ear canal or on the outer ear, here’s how to safely remove it:
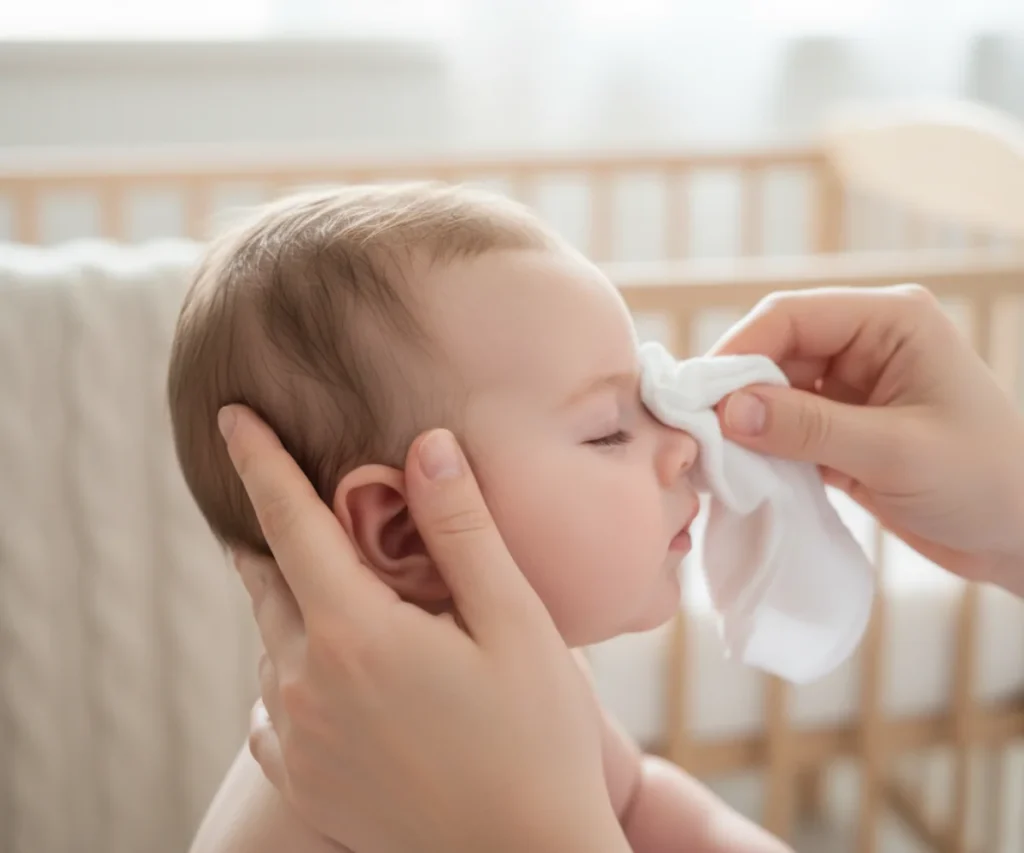
Method 1: The Warm, Damp Cloth (The Safest and Most Recommended Method)
This is the primary method recommended by pediatricians for routine baby ear hygiene. It’s simple, effective, and completely safe.
What You’ll Need:
- A soft, clean washcloth or piece of cotton wool
- Warm (not hot) water
Step-by-Step Guide:
- Prepare Your Baby: Choose a calm time, perhaps after a bath or during a diaper change when your baby is relaxed. Lay them on their back or hold them securely in your lap.
- Wet the Cloth: Dampen the corner of the washcloth or cotton wool with warm water. Wring it out thoroughly so it’s just damp, not dripping wet.
- Gently Wipe the Outer Ear: Use your finger, wrapped in the damp cloth, to very gently wipe around the folds and crevices of the outer ear, and just inside the ear canal opening. Only clean what you can visibly see.
- Avoid the Canal: Do not insert your finger or the cloth into the ear canal itself. The goal is to wipe away any wax that has naturally moved to the exterior.
- Repeat on the Other Ear: Use a fresh, clean section of the cloth or new cotton wool for the other ear.
- Pat Dry: Gently pat the outer ear dry with a soft, dry part of the cloth to prevent moisture buildup.
This method is usually sufficient to manage any visible earwax and maintain good ear hygiene.
Method 2: Earwax Softening Drops (ONLY with Pediatrician Approval)
In rare cases, if your baby has a significant amount of earwax that is causing symptoms (like affecting hearing or making it hard for the doctor to examine the ear), your pediatrician might suggest using earwax softening drops. This should *never* be done without explicit instructions from your doctor.
Types of Drops Your Pediatrician Might Recommend:
- Saline Solution: Often considered gentler than other options.
- Mineral Oil or Baby Oil: A few drops can help soften hardened wax.
- Hydrogen Peroxide (Very Diluted and Rarely Recommended for Babies): If recommended, it would be a highly diluted solution and under strict medical supervision due to potential irritation.
Important Considerations BEFORE Using Drops:
- Consult Your Pediatrician: This is non-negotiable. Ear drops should only be used if your doctor has examined your baby’s ears, confirmed there’s no infection or perforated eardrum, and given you specific instructions.
- Follow Instructions Precisely: Your doctor will tell you the exact type of drop, the number of drops, and how often to apply them.
- Do NOT Force: Never try to force drops into a resistant baby’s ear.
General Steps for Applying Ear Drops (If Advised by Pediatrician):
- Warm the Drops: If stored in the fridge, warm the bottle by holding it in your hands for a few minutes. Cold drops can cause dizziness.
- Position Your Baby: Lay your baby on their side with the affected ear facing upwards.
- Apply Drops: Gently pull the outer earlobe slightly down and back to straighten the ear canal. Carefully squeeze the recommended number of drops into the ear canal opening. Avoid touching the dropper to your baby’s ear.
- Keep Position: Keep your baby in this position for a few minutes to allow the drops to penetrate the wax.
- Wipe Excess: Gently wipe away any excess solution that drains out with a clean cotton ball or tissue. Do not insert anything into the ear.
When to Call the Pediatrician: Beyond Home Care

Sometimes, earwax buildup requires professional help. It’s important to know when to stop trying home remedies and seek medical advice. Contact your pediatrician if:
- Symptoms Worsen: If your baby develops any signs of pain, fever, discharge, or increased fussiness.
- Persistent Buildup: If you notice a significant amount of wax that doesn’t clear with gentle external cleaning, or if it seems to be blocking the ear canal.
- Hearing Concerns: If you suspect your baby’s hearing is affected, or if they are not responding to sounds as they usually do.
- Uncertainty or Worry: If you are ever unsure or concerned about your baby’s ear health, it’s always best to consult a medical professional. Pediatricians are experts and can safely examine and, if necessary, remove earwax using specialized tools and techniques.
Never attempt to remove impacted earwax yourself, as this can cause serious damage.
Common Myths About Baby Earwax Debunked

Navigating parenting advice can be tricky, and there are many misconceptions about earwax. Let’s clear up some common myths:
- Myth: All earwax needs to be removed.
Fact: Earwax is healthy and protective. Most of the time, the ears clean themselves. Only excessive, symptomatic buildup needs attention. - Myth: Cotton swabs are safe for cleaning baby ears.
Fact: Absolutely not. Cotton swabs are the leading cause of ear injuries and wax impaction in children. They push wax deeper and can damage the eardrum. - Myth: Dark earwax means it’s dirty or infected.
Fact: The color of earwax varies naturally, from light yellow to dark brown. Darker wax simply means it’s older and has collected more dirt and debris, but doesn’t necessarily indicate infection. - Myth: Baby earwax causes ear infections.
Fact: While severe impaction can sometimes contribute to problems, earwax itself is not usually the cause of ear infections. In fact, its protective properties can help prevent them. Ear infections are typically caused by bacteria or viruses. - Myth: Ear candling is a safe and effective way to remove earwax.
Fact: Ear candling is dangerous and has no proven benefits. It can cause serious burns, ear canal blockage, and eardrum perforation.
Maintaining Healthy Ears: Preventative Measures
The best approach to baby earwax is usually a hands-off one. However, you can support your baby’s natural ear health with these simple preventative measures:
- Gentle External Cleaning: As discussed, a soft, damp cloth used to wipe the outer ear during bath time is typically all that’s needed. This removes any wax that has naturally migrated out of the canal.
- Avoid Internal Cleaning: Resist the urge to poke or prod inside the ear canal. Let the ears do their job.
- Regular Check-ups: Your pediatrician will check your baby’s ears during routine visits. They can spot any potential issues early.
- Be Mindful of Water in Ears: While a little water during baths is usually fine, ensure your baby’s ears are gently dried externally afterwards. For babies prone to ear infections, discuss earplugs or special precautions with your doctor.
- Observe Your Baby: Pay attention to any changes in behavior, fussiness, or signs of discomfort that might indicate an ear issue. Early detection is key.
Remember, your baby’s ears are designed to be self-cleaning. Trusting this natural process and intervening only when necessary, and always safely, is the best approach.
Conclusion: Prioritizing Safety and Trusting Nature

Navigating the world of baby care can be overwhelming, but when it comes to earwax, remember that your baby’s body is wonderfully designed to protect itself. Earwax is a beneficial, natural substance, and aggressive cleaning attempts can do more harm than good. Stick to the simple, safe method of gently wiping the outer ear with a warm, damp cloth. Always keep cotton swabs and other objects away from the inner ear. If you have any concerns about excessive earwax, discomfort, or potential infection, your pediatrician is your best resource. They can provide an accurate diagnosis and guide you on the safest course of action. With a little patience and the right knowledge, you can ensure your baby’s delicate ears remain healthy and happy.